
Threaded Insert Installation is a detailed process
 Installation of threaded inserts, or Helicoils (popular brand name), is common in most machine shops – but your part could be exposed to risks if your shop isn’t doing it right. Preece Machining & Assembly on the other hand has many standard procedures to ensure your inserts are installed properly and your parts arrive as expected.
Standard Applications of Threaded Inserts
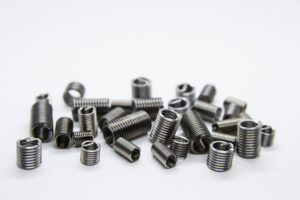
Standard threaded inserts (STI) have been around for a long time and were originally conceived to fix stripped out threads. The user would drill out the hole with a specific size drill and re-tap the hole to accept the insert. This repairs the thread and allows the part to continue to function.
The aerospace community has adopted and adapted these inserts to meet their needs. Its now common for CNC machine shops to make threaded holes to accept the inserts right off the bat. There are many reason for this. Is some cases, the insert is stronger than the base material. We frequently install inserts in aluminum parts and these threads are stronger than the thread would be in machined into the aluminum.
Another common use is to to ensure the thread and fastener do not interfere with each other. For example, if the part’s base metal is stainless steel, and the designed fastener is stainless steel, the customer may opt to have the part designed with Nitronic 60 threaded inserts. This is to ensure the threads of the fastener and the threads in the base part do not gall together. Galling could result in scrapping an expensive component or a critical failure of a core component.
Risks Associated With Installing Threaded Inserts
Threaded inserts have become an industry standard in aerospace and commercial communities. Shops need to have procedures in place to ensure these inserts are installed properly. One concern with threaded inserts is FOD (Foreign Object Debris). Inserts with tangs pose a extra risk: the tang can become lost or stuck in the bottom of a blind hole. One obvious solution to this issue is to specify tangless inserts. If this is not an option, the way Preece Machining & Assembly handles this issue is to attach each broken off tang to a piece of tape that is attached to the First article as proof the tang was retrieved.
Another risk when installing inserts is a failure on the machining side. While preparing the hole it is crucial that the proper depth of thread is achieved to ensure proper installation. Improper installation is when the insert is driven too deep into the hole or when the insert is above flush from the hole. Preece Machining & Assembly has well documented procedures and standards in place to ensure the insert can be installed correctly.
Design Tips When Considering Using Threaded Inserts
Do you need threaded inserts?
First and most importantly, if you do not have a direct need for threaded inserts you are absolutely adding extra costs to your part. These costs may seem small by just judging the cost of a single insert, which may be as little as $.2, however this is not the only cost. Lets take a 1/4-20 tangless insert as an example. You have the cost of the tool ($300-$400), the cost of the labor to install the insert, the cost of a tap, thread gage, and finally the cost of a single insert. While most shops like Preece Machining & Assembly already have the tool, the tap, and the thread gage; these are extra costs to the shop that are not considered when you look at a standard thread. This is not to imply you should expect to see an increase of hundreds of dollars for a single insert but you should expect some increase over threads in the base metal.
How to call out threaded inserts on prints?
There are many ways to call out threaded inserts on technical drawings. First lets cover the insert itself. You need a way to communicate with the CNC machine shop you are working with exactly what insert you want used. There are a few ways to go about doing this:
1) You can call out the thread as you normally would calling attention to the note area where you designate the insert type and part number. (The 5 is calling attention to the 5th note were the insert and insert length are called out)

2) You can call out the insert right at the hole location. (In this case the actual insert is called out elsewhere on the print)
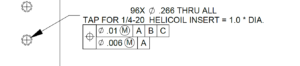
You should provide the insert part number, the insert thread and the length of insert you are going to be using. Threaded inserts lengths are made in multiples of the outside diameter of the insert. For example 1D, 1.5D, and 2D would correspond to .164, .246, and .328 for a 8-32 threaded insert. It is not necessary to call out these numeric depths for the insert. It is only necessary to provide the insert depth you plan to use. When designing your model you should model the insert holes with the tap drill required for the insert.
Precision Machining and Precision Insert Installation
Our precision CNC machine shop is equipped to handle your threaded insert application as well as your machining needs. Preece Machining & Assembly has produced precision parts for the aerospace industry for years and has proven procedures in place to ensure your projects success. Threaded inserts is an area were success is critical to your project; hedge your project by working with Preece Machining & Assembly.
We would love the opportunity to discuss threaded inserts with you, get in touch, and we will gladly assist.